I always wanted to have some custom icons for my Home-Assistant setup. Unfortunately, if you set a SVG directly via URL (/local/myicon.svg) it does not change color depending on its state. On the other hand, if you set an MDI icon, the color changes.
So I looked for ways to get color changing icons and came across Thomas Lovén’s hass-fontawesome that does exactly that for the Font-Awesome icons.
I tried to use his generate.py to generate a custom font file from my SVG’s but it failed.
After looking into it, I change quite a bit so that the script worked for me (see
my fork
).
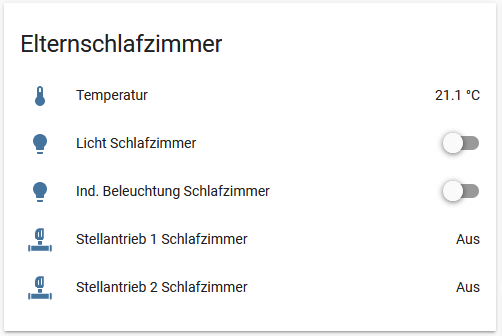
I struggled a bit getting my font to work but finally here’s an example of what I got (the two bottom icons):
If you also want to create your own iconfont, here are some obstacles that made me strugle.
1. Make sure your SVG has just one path, the generate script will grab the first path and use that in the font file. 🔗
This is an example of a not working SVG, as you can see it contains multiple path nodes.
 1<?xml version="1.0" encoding="UTF-8" standalone="no"?>
 2<svg
 3   xmlns:dc="http://purl.org/dc/elements/1.1/"
 4   xmlns:cc="http://creativecommons.org/ns#"
 5   xmlns:rdf="http://www.w3.org/1999/02/22-rdf-syntax-ns#"
 6   xmlns:svg="http://www.w3.org/2000/svg"
 7   xmlns="http://www.w3.org/2000/svg"
 8   xml:space="preserve"
 9   style="enable-background:new 0 0 32 32;"
10   viewBox="0 0 32 32"
11   y="0px"
12   x="0px"
13   id="Ebene_1"
14   version="1.1"><metadata
15     id="metadata3356"><rdf:RDF><cc:Work
16         rdf:about=""><dc:format>image/svg+xml</dc:format><dc:type
17           rdf:resource="http://purl.org/dc/dcmitype/StillImage" /><dc:title></dc:title></cc:Work></rdf:RDF></metadata><defs
18     id="defs3354" /><path
19     style="fill:#73BA1B;"
20     id="path4155"
21     d="m 7,21 18,0 0,5 -18,0 0,-5 z" /><path
22     style="fill:#73BA1B;"
23     id="path4153"
24     d="m 18,20 0,-5.789271 -4,0 L 14,20 l 4,0 z" /><path
25     style="fill:#73BA1B;"
26     id="path4151"
27     d="m 5,20 0,0 c -0.6,0 -1,0.4 -1,1 l 0,5 c 0,0.5 0.4,1 1,1 l 0,0 c 0.5,0 1,-0.4 1,-1 L 6,21 C 6,20.4 5.6,20 5,20 Z" /><path
28     style="fill:#73BA1B;"
29     id="path4149"
30     d="m 27,20 0,0 c -0.6,0 -1,0.4 -1,1 l 0,5 c 0,0.5 0.4,1 1,1 l 0,0 c 0.5,0 1,-0.4 1,-1 l 0,-5 c 0,-0.6 -0.4,-1 -1,-1 z" /><path
31     style="fill:#73BA1B;"
32     id="path4147"
33     d="m 16,2.9960394 c -2.8,0 -5,1.5720509 -5,3.5728426 l 0,5.001981 c 0,0.428741 0.4,0.714568 1,0.714568 l 1,0 L 13,13 l 6,0 0,-0.714569 c 0.6,0 1,-0.285827 1,-0.714568 L 20,3.710608 C 20,3.2818668 19.6,2.9960394 19,2.9960394 l -3,0 z m 1.5,1.4291372 c 0.3,0 0.5,0.1429137 0.5,0.3572843 l 0,5.7165491 c 0,0.21437 -0.2,0.357284 -0.5,0.357284 -0.3,0 -0.5,-0.142914 -0.5,-0.357284 l 0,-5.7165491 c 0,-0.2143706 0.2,-0.3572843 0.5,-0.3572843 z m -3,1.4291372 c 0.3,0 0.5,0.1429138 0.5,0.3572842 l 0,4.287412 c 0,0.21437 -0.2,0.357284 -0.5,0.357284 -0.3,0 -0.5,-0.142914 -0.5,-0.357284 l 0,-4.287412 c 0,-0.2143704 0.2,-0.3572842 0.5,-0.3572842 z" /><path
34     style="fill:#73BA1B;"
35     id="path4161"
36     d="m 22,23.5 a 6,6 0 0 1 -6,6 6,6 0 0 1 -6,-6 6,6 0 0 1 6,-6 6,6 0 0 1 6,6 z" /><path
37     style="fill:#ffffff;"
38     d="M 16 18.5 A 5 5 0 0 0 11.675781 21 L 20.322266 21 A 5 5 0 0 0 16 18.5 z M 11.677734 26 A 5 5 0 0 0 16 28.5 A 5 5 0 0 0 20.324219 26 L 11.677734 26 z "
39     id="path4166" /></svg>
Simply use Inkscape for example an combine the paths using the appropriate tools.
2. Adjust the settings in the generator sxcript 🔗
There a 3 settings that can be adjusted in the generate.py.
1PREFFIX = "fas"
2OUTFILE = "hass-fontawesome-solid.html"
3SIZE = 1024
PREFFIX defines what will be the preffix you later on will use in your HA config. If you for example set it to fas you will define a icon in your config like icon: fas:clone
OUTFILE defines the name of the resulting html file.
SIZE defines the size of the iocns, let this value as it is.
Place the generator.py in the same folder as your SVG icons and run it from there: python3 generator.py. The resulting html will appear in the same folder.
3. Install the font file in the right place 🔗
Make sure you’ve created a www folder inside your Home Assistant config folder. In there, place the generated html file.
4. Configure the custom font file for use in your HA config 🔗
1frontend:
2  extra_html_url:
3    - /local/hass-custom-font.html
I used cutomize_glob to set one of my new icons for all of my heating valves like so:
1homeassistant:
2  customize_glob:
3    "binary_sensor.stellantrieb*":
4       icon: lox:valve
Restart HA after editing the config!
5. Make sure the cache of your browser doesn’t fool you 🔗
My firefox fooled me with its cache. Simply hit Ctrl + Shift + Del and make sure to delete the cache when trying to get the font working, after that refresh the browser with F5.